Salesforce Developer Skills with Best Practices Checklist

Consultant at Fexle | Former Web Developer at Hostlelo | Founder, CodxMan Dev. Community | Full stack developer | Salesforce Developer | ❤️ Javascript
A developer checklist is a list of tasks that a Salesforce developer should complete before releasing a piece of software on the Salesforce platform. It is used as a reminder of important tasks that need to be done and can help ensure that the software is high quality and free of bugs.
Here are some common items that should be included on a Salesforce developer checklist:
Code review: Before releasing the software, it should be reviewed by other members of the development team to ensure that it is well-written, easy to understand, and free of bugs.
Unit testing: The software should be thoroughly tested to ensure that it functions as intended. This can include automated tests, as well as manual testing. Apex test classes should be created for all Apex classes, triggers, and Visualforce pages.
Performance testing: The software should be tested to ensure that it performs well under different loads and conditions. This can include testing for governor limits, CPU usage, and other performance metrics.
Security testing: The software should be tested for vulnerabilities, such as cross-site scripting (XSS) attacks and SOQL injection.
User acceptance testing: The software should be tested by end users to ensure that it meets their needs and is easy to use.
Deployment: The software should be properly deployed and configured using Salesforce’s change sets or Salesforce DX.
Monitoring and maintenance: The software should be monitored for errors and performance issues, and any issues should be promptly addressed.
Compliance: The software should comply with Salesforce’s security and development best practices, such as the use of Shield Platform Encryption for sensitive data.
By following a developer checklist, Salesforce developers can ensure that their software is of high quality, secure, and in compliance with Salesforce's best practices before releasing it to end users. This can help prevent issues and improve the overall user experience.
- It's also important for Salesforce developers to keep this in mind.
Salesforce releases: Salesforce releases new updates and features regularly, and developers need to stay up-to-date on these releases and ensure that their software is compatible with the latest version.
Third-party applications: If the software being developed includes any third-party applications, it's important to ensure that they are compatible with the Salesforce platform and have been properly installed and configured.
Data migration: If the software involves data migration, it's important to ensure that the data is properly migrated and that no data is lost in the process.
Error handling: The software should have proper error handling in place to catch any errors that may occur and provide meaningful error messages to the users.
Accessibility: The software should be accessible to all users, including those with disabilities. This includes compliance with Salesforce's accessibility standards, such as providing alternative text for images and using proper ARIA tags.
Scalability: The software should be designed to handle an increasing number of users and data. This may include using Salesforce's recommended best practices for handling large data sets and designing for scalability.
The descriptive list that developers should always use:
1. Information and comments
Comments should always add value. Items marked “suggest” below indicate that they deviate from best practices; they can also add value when working with junior developers.
The top comment block description explains what the code does/business purpose
The top comment block includes the date the class was last modified by a developer (format: Dec-30-2022)
Suggest that in-line comments are included on the line above variables explaining the variables
Suggest that in-line that comments are included on the line above all SOQL queries explaining why the query is required
Suggest that in-line comments are included on the line above any loops explaining what the loop does and why it is required
Suggest that in-line comments are included on the line above any DML explaining what is being committed and why
Suggest that in-line comments are included on the line above what is being caught in try/catch and explain what is handled
Suggest in-line comments are included on the line above limits being checked (if they are checked) and include what limits are.
2. Apex development
Declarative development was used when applicable
The solution could not be achieved declaratively
- For example, if a complex business requirement cannot be met using the built-in functionality of Salesforce or if specific functionality is not available in the platform, a developer might need to write Apex code to achieve the desired outcome.
The class uses the invocable method if applicable
Order of execution was reviewed if assignment rules, invocable, future, or queueable are being used.
In this example, when an account is updated, the trigger will run first and update the account's description. Then the validation rule will check if the name is longer than 100 characters, if it is an error will be added. The assignment rule will run and assign the account owner. The Auto-response rule will send an email to the account's email address. The workflow rule will update the last modified date. The Apex code class will update the industry field. The Invocable method will update the type field. The future method will update the account name. And finally, the Queueable class will update the account description.
The code is on the latest API version (<apiVersion>57.0</apiVersion> ) 06-02-2023 Current version.
Only one trigger per object.
- Only one trigger per object means that you can only have one trigger defined for a given object in Salesforce. This means that if you have multiple triggers defined for the same object, only one of them will execute. The order in which multiple triggers on the same object execute is determined by the order in which they were created.
No logic is in the trigger.
- A trigger with no logic means that there is no code within the trigger that performs any actions. This could be because the trigger is intended to be a placeholder, or because the logic has been moved to a separate class (Helper class).
Handler is context-specific
- Article for trigger context
The trigger/trigger handler prevents recursion
- In this example, the trigger ExampleTrigger calls the method handleBeforeInsert in the ExampleTriggerHandler class, which contains the logic for the trigger. The private static Boolean variable runOnce is used to keep track of whether the trigger has already been executed and prevent it from running again if it has.
When the trigger is executed, the handleBeforeInsert method checks the value of runOnce. If it is true, the method returns and no further action is taken. If it is false, the method sets runOnce to true and then performs the trigger logic. After the trigger logic is executed, the method sets runOnce back to false. This ensures that the trigger will not run again in the same transaction and prevents recursion.
Updates/changes to the current record in context should be done before insert/update the context
In this example, the trigger ExampleTrigger is defined for the Account object and will execute before an insert operation on the Account object. The trigger iterates over the list of Account records in the Trigger.new context variable, updates the Name field to be in uppercase, and then the record will be inserted with the updated value.
Similarly, if you want to update a record before updating it, you can make changes to the record in the context in a before-update trigger, and those changes will be saved to the database when you update the record.
Code should be bulkified
Bulkification is the process of making sure your Apex code can handle multiple records at once, rather than just one record at a time. This is important because triggers are executed in bulk and can potentially operate on hundreds or thousands of records at once, and if your code is not designed to handle this, it can result in performance issues and errors.
In the above example, the trigger ExampleTrigger is defined for the Account object and will execute before an insert operation on the Account object. The trigger creates a map of Account records with the Id field as the key, allowing you to access individual records by their Id at constant time.
After the map is created, the trigger performs any database operations that are needed and updates the Name field of each Account record to be in uppercase. This approach allows you to perform all database operations in one query, reducing the number of queries executed and improving performance.
By bulkifying your code, you can ensure that it can handle large volumes of data efficiently and avoid performance issues and errors when executing triggers.
There are no SOQL queries in the loop
- Because if we use SOQL inside a loop it can reach the governor limit, and cause an error.
Code includes null checks
How to query with null
Be aware of the consequences of null
Only use null check, when necessary, better to use try/catch when possible
There are no DML statements in the loop
If we use DML inside a loop it will reach governor limit and cause an error.
List<Integer> numbers = new List<Integer> {1, 2, 3, 4, 5};
Integer total = 0;
for (Integer number : numbers) {
total += number;
}
- System.debug(total);
Helper methods are bulkified
- Modifying Apex code so that it can handle a large number of records in a single transaction, instead of processing one record at a time. This is important because Apex has limits on the number of records that can be processed in a single transaction. When code is bulkified, it can handle multiple records in a single transaction, thereby reducing the number of transactions required to process a large number of records.
Loops are efficient for large volumes
For loop includes a query in DEFINITION of the loop for large data
Loops are efficient for processing large volumes of data when used properly, as they allow you to automate repetitive tasks and process large amounts of data in a single transaction. However, it's important to keep in mind that loops can also be resource-intensive if not used properly, particularly when processing large volumes of data.
To ensure that loops are efficient for large volumes, it is important to consider the following factors:
Data retrieval: Make sure to retrieve data in bulk using SOQL queries instead of querying for each record individually.
Processing logic: Minimize the amount of processing that takes place within the loop and avoid using complex operations that can slow down performance.
Transactions: Reduce the number of transactions by using bulk operations instead of individual transactions.
Code optimization: Use efficient algorithms and data structures to minimize the amount of processing required, and optimize the code to minimize the execution time.
By considering these factors and properly optimizing the loop, it is possible to make loops efficient for processing large volumes of data. It's also important to test and monitor the performance of loops, particularly when processing large amounts of data, to ensure that they continue to perform efficiently
Future/Queueable/Batch/Scheduled Apex are used appropriately
By using each type of asynchronous processing appropriately, you can optimize the performance and scalability of your Apex code for large volumes of data.
Respect limitations
Scope the full requirements and use cases
Implement the best solutions for the requirements
-
- Using Stateful and Allow Callouts
Limits will not be reached
- The maximum number of future method invocations per 24-hour period is 250,000, or the number of user licenses in your organization multiplied by 200 (whichever is greater). This limit is for your entire org and is shared with all asynchronous Apex: Batch Apex, Queueable Apex, Scheduled Apex, and Future methods.
Custom Settings/Labels/Metadata is used
No IDs, Names, Picklist Values, Descriptions, Strings, Numbers, etc are hard-coded
Custom labels and hierarchical custom settings are used instead of hard coding
The design makes use of custom metadata instead of custom settings when appropriate
Code complies with security and checks permissions before executing DML
With Sharing and Without Sharing keywords are avoided on domain Apex to ensure calling context drives this aspect
- With Sharing is preferred to enforce security as needed
Security Best Practices are followed in the setup
Static Code Analysis via a third-party tool/PMD was run against the Apex development
Best practice naming conventions are used
Object name is included in class (trigger, handler, test class is named after class it is testing)
The class name explains when it is used (helper)
An error logging framework is used to catch and handle built-in exceptions, as well as custom exceptions and log errors
- Consider advanced error logging frameworks to catch rollback issues
3. Lightning Web Components
Calls to the server are limited (pass info between components when possible)
In Lightning Web Components (LWC), calls to the server should be limited to reduce the amount of data that needs to be transmitted and processed, which can improve the performance and scalability of your application. Instead of making server calls, you should pass information between components when possible.
In this example, the contactId is passed from the parent component to the child component using a property. The child component can then use the contactId without making a server call. By reducing the number of server calls, you can improve the performance and scalability of your LWC application.
Queries only contain columns in SELECT that are used/needed
Always fetch the data that is needed on your user side.
Always use a try-catch block while calling from the server.
Data is lazy loaded when possible and does not preload
It's best practice to lazy load data, which means loading data only when it's needed, rather than preloading all the data upfront. This helps to reduce the amount of data that needs to be transmitted and processed, which can improve the performance and scalability of your application.
Here is an example of lazy loading data in LWC:
In this example, the loadData method is called to retrieve a batch of data from the server when the component is first connected and when the user clicks the "Load More" button. The offset and limit properties are used to determine which records to retrieve. By lazy loading the data in smaller batches, you can reduce the amount of data that needs to be transmitted and processed, which can improve the performance and scalability of your LWC application.
Data caching is used when possible and was evaluated
Lightning Data Service was evaluated by using Apex to create, delete, and update records
Storable Actions were evaluated
Caching/LDS was evaluated
Code uses static schema instead of dynamic schema when possible
In Lightning Web Components (LWC), it's best practice to use a static schema when possible, as this can improve the performance and scalability of your application. A static schema means that you know the structure of your data ahead of time and can use this information to optimize your code.
In this example, the getContacts Apex method returns a list of contacts, and the structure of each contact is known ahead of time. This means that the code can use the Name, Title, and Phone fields without checking if they exist on each contact first. By using a static schema, you can simplify your code and improve its performance and scalability.
Code DOES NOT use pub/sub for parent-child or child-parent communication
A parent component communicates with a child component by either:
Setting the @api properties of the child (apiProperty recipe)
Calling an @api method defined in the child component
A child component communicates with its parent component by dispatching a DOM event with or without a data payload (eventWithData recipe and eventSimple recipe respectively).
Always use CustomEvent (not Event), even when the event doesn’t have a data payload
Prefer passing data using primitive data types in the event payload
If you must pass data using a non-primitive data type in the event payload, pass a copy of the object or array to avoid leaking private objects and unpredictable mutations by the event listener
If you need to pass a record, pass the record ID
Use the Lightning Messaging channel to communicate across the DOM in the Lightning page; c/pubsub should only be used if there are limitations to LMS
Use of third-party JavaScript libraries is limited or removed if possible
Prefer Lightning SLDS (including images) to external images, lock image size (no high res)
Use custom CSS customizer if a unique look/feel is needed
Code is inclusive and makes use of Accessibility Attributes
- For example, you can use the lightning-button component and set the title attribute to provide a tooltip for screen reader users.

Here's an example of a lightning-button component with an aria-label attribute
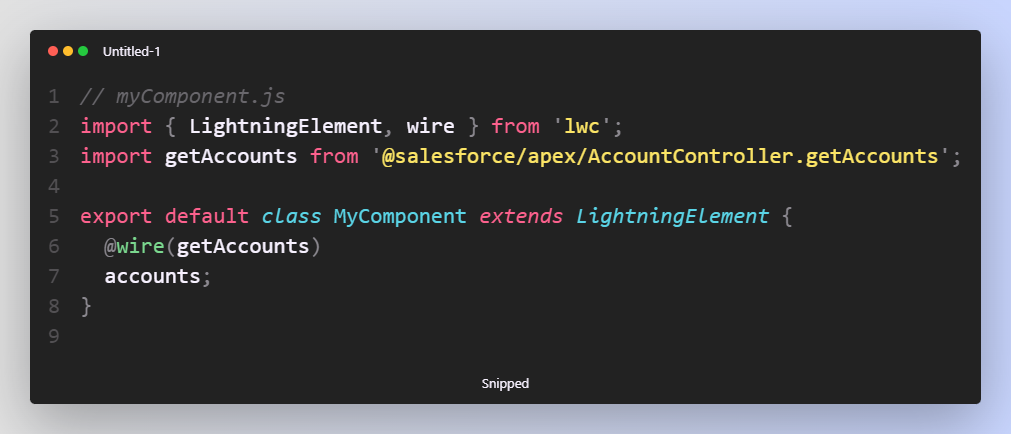
Minimize the number of times the component is rendered
- by the @wire decorator to declaratively fetch data and automatically update the component when the data changes. This helps to minimize the number of times the component is rendered.
Here's an example of a component that uses the @wire decorator to fetch data:
Code makes use of Canvas where applicable instead of iFrame; iFrames are sometimes easier but provide less functionality
- LWC provides a built-in lightning-layout-item component that allows you to create a flexible layout. You can use this component to create custom visualizations and charts. Here's an example of a component that uses the lightning-layout-item component to create a bar chart:
Code does not make use of window.location (see docs)
- In Apex, you can use the PageReference class to create URLs and navigate to pages. This class provides a safer way to redirect the user to a new page.
Here's an example of how to use the PageReference class to create a URL:
Aura components are migrated to LWC when possible
- Architect signs off when Aura component cannot be migrated and needs to be updated instead
here's a detailed explanation of migrating Aura components to LWC and when to update instead:
- Aura components are migrated to LWC when possible:
- Migrating from Aura to LWC can provide a number of benefits, including improved performance, simplified development, and better alignment with modern web standards. When migrating from Aura to LWC, you can follow these steps:
Identify the components that need to be migrated
Create LWC components that replicate the functionality of the Aura components
Test the LWC components to ensure they work as expected
Deploy the LWC components to your org
Here's an example of how to migrate an Aura component to an LWC component:
Aura Component:
LWC Component:
Lightning Component Inspector is used to monitor the performance impact of new components
The Lightning Component Inspector is a powerful tool that allows developers to analyze the performance of their Lightning components. It provides detailed information about the performance of each component, including the time it takes to load and render the component, as well as any data passed to and from the component.
When developing new Lightning components, it's important to monitor their performance to ensure that they don't negatively impact the overall performance of the application. This is where the Lightning Component Inspector comes in. It can help identify performance bottlenecks and provide guidance on how to improve the component's performance.
Here's an example of how the Lightning Component Inspector can be used to monitor the performance impact of a new component:
In this example, the component displays a Lightning card with a spinner while it loads data from the server. Once the data is loaded, it displays the Name field using a Lightning output field.
To monitor the performance of this component, we can open the Lightning Component Inspector by right-clicking on the component in the app builder and selecting "View Component in Salesforce Lightning Inspector." The inspector will display a variety of information about the component, including its performance.
We can use this information to identify any performance bottlenecks in the component and make changes to improve its performance. For example, we might choose to use a more lightweight alternative to the lightning-card component, or we might optimize the server call to retrieve the data more efficiently.
By using the Lightning Component Inspector to monitor the performance of our components, we can ensure that our applications are fast and responsive, even as we continue to add new features and functionality.
The component follows LWC best practices
- LWC (Lightning Web Components) has a set of best practices that developers can follow to ensure that their components are performant, maintainable, and scalable. Here are some examples of LWC best practices, along with code snippets that illustrate how to implement them.
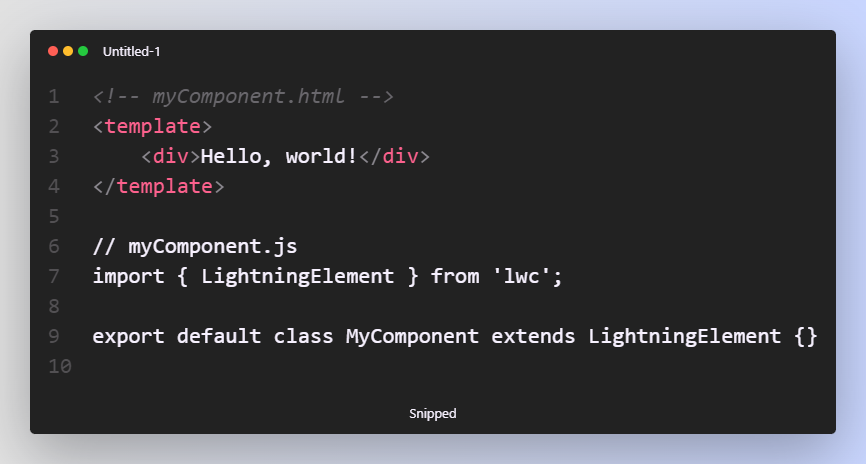
- Keep the component's markup and JavaScript code separate
In LWC, the component's markup and JavaScript code are stored in separate files. This helps keep the code organized and makes it easier to maintain.
- Use @api and @track to define public and private properties
LWC provides decorators such as @api and @track to define public and private properties in the component. This helps make the component's API more clear and prevents unnecessary re-renders.

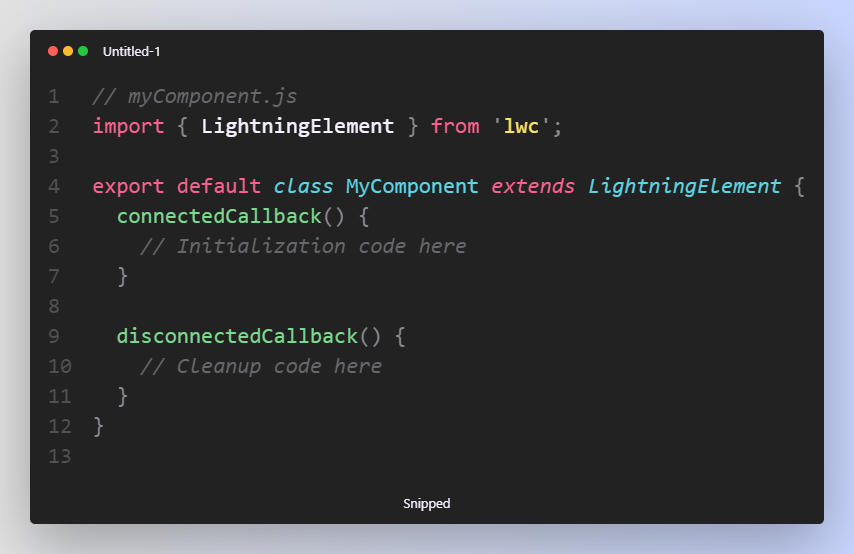
- Use lifecycle hooks to handle component initialization and cleanup
LWC provides lifecycle hooks such as connectedCallback and disconnectedCallback to handle component initialization and cleanup. This helps ensure that the component's state is initialized properly and that any resources are released when the component is removed from the DOM.
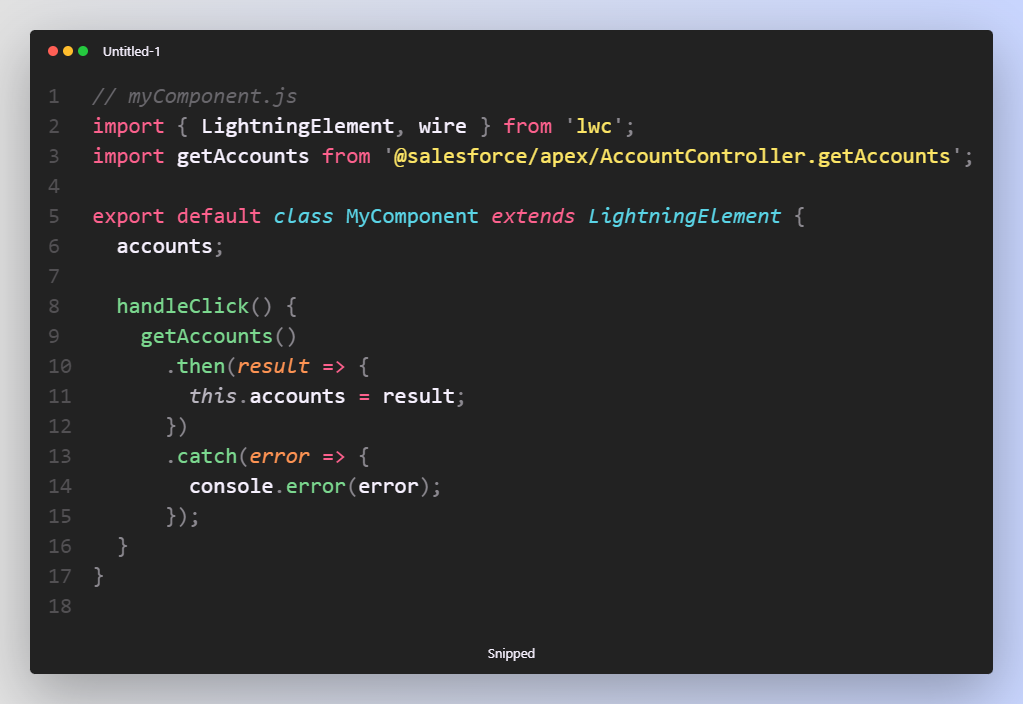
- Use imperative Apex to interact with the server
LWC provides a way to interact with the server using imperative Apex. This allows the component to make server calls and handle the response in a programmatic way.
- Use wire adapters to automatically retrieve data from the server
LWC provides wire adapters to automatically retrieve data from the server and update the component's state. This helps reduce the amount of code required to handle server calls and ensures that the data is always up-to-date.
Each LWC has a Jest test that tests the component’s behavior in isolation
Jest is a testing framework used for testing JavaScript applications. It can be used to write tests for LWC components. Writing Jest tests ensures that the components behave as expected and that changes to the code do not break the existing functionality.
To write a Jest test for an LWC component, we can create a test file in the tests folder in the component directory. For example, if we have a component named myComponent, we can create a file named myComponent.test.js.
Here is an example Jest test for an LWC component:In this example, we create an instance of the c-my-component component using createElement(). We set the message property to 'Hello World' and append the component to the document body. We then use querySelector() to find the element with the class message and check that its text content is 'Hello World' using the expect() function.
This test checks that the component displays the correct message when the message property is set. By writing tests for our LWC components, we can ensure that they behave as expected and catch any issues before they make it to production.
4. Apex Test Classes
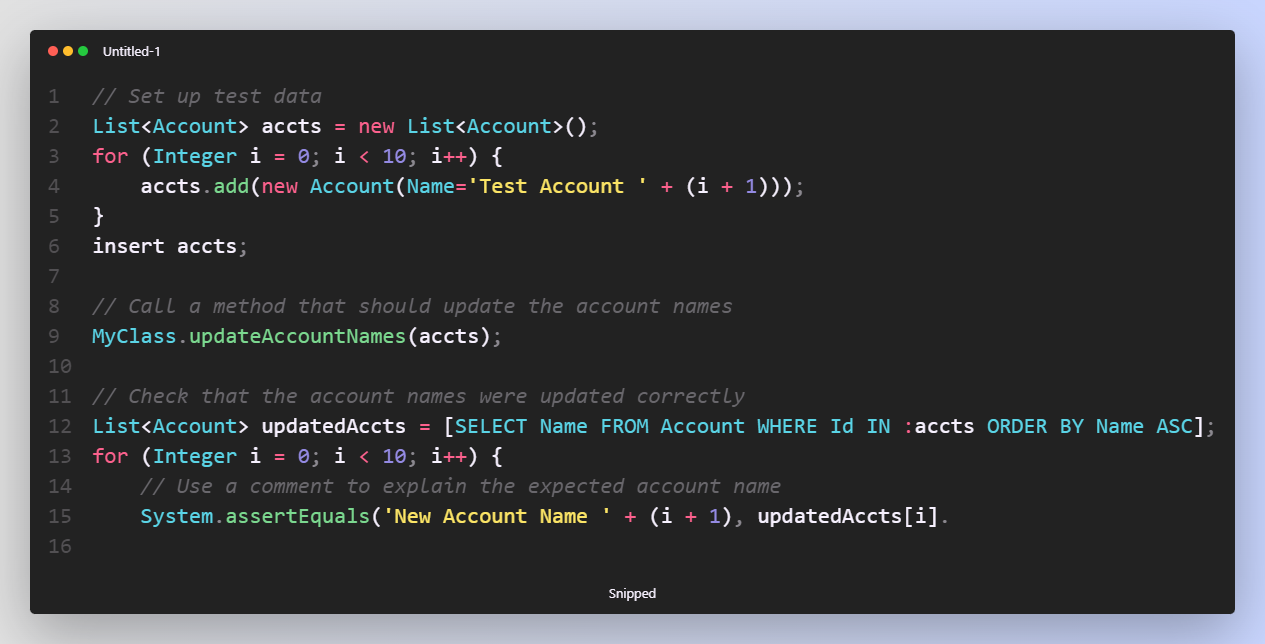
Tests are meaningful
Tests cover positive scenarios
Tests cover negative scenario
Test cover null scenario
Tests use custom settings instead of hard coding
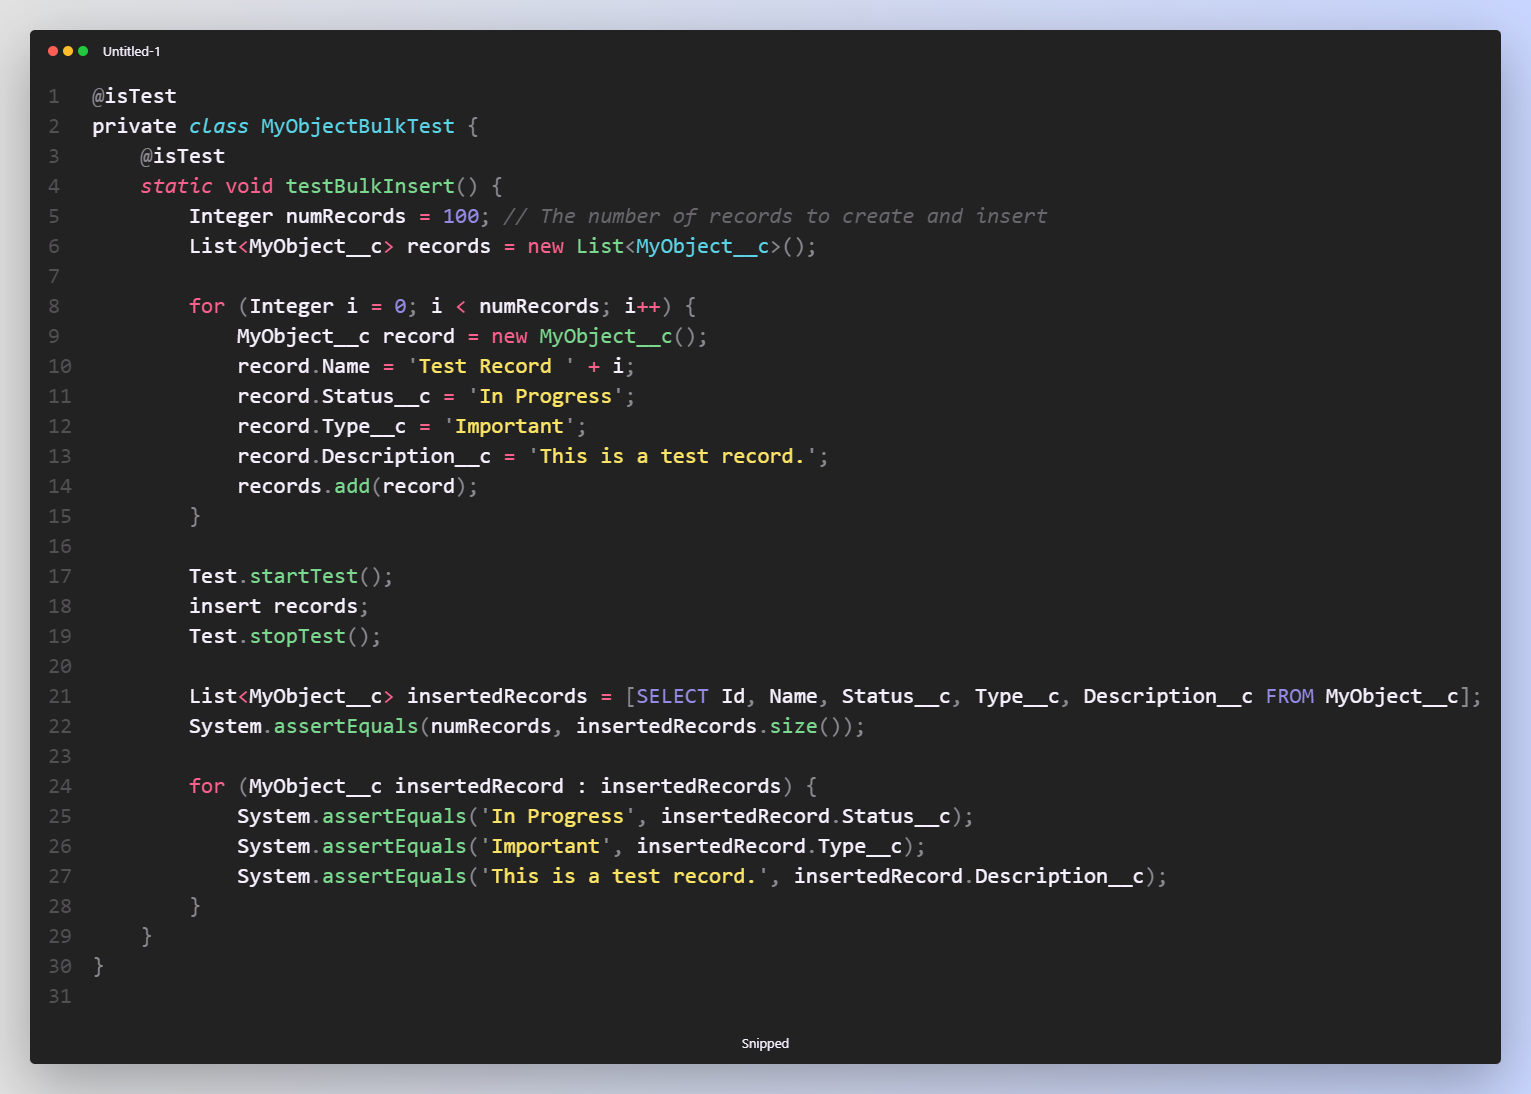
- For bulk test (e.g., create xx records, insert xx records, assert xx records meet scenario)
In the example below, we define a test method called testBulkInsert() that creates and inserts a specific number of records of the MyObject__c custom object. We use a for loop to create each record and set its Name, Status__c, Type__c, and Description__c fields to the same values for each record. We then add each record to a list and insert the list of records in a single DML operation inside a Test.startTest() and Test.stopTest() block.
After inserting the records, we query all MyObject__c records and assert that the correct number of records were inserted by comparing the size of the returned list to the number of records that we created. We then iterate through each inserted record and assert that its Status__c, Type__c, and Description__c fields are equal to the expected values.
By using a bulk test like this, we can quickly create and insert a large number of records and verify that they meet the expected criteria. This helps ensure that our code works correctly for a variety of use cases and can handle large amounts of data.
Tests provide 90%+ code coverage
If not able to achieve 90%, the explanation is in the comment block at the top of the class, and an additional sign off required
A goal of 90% ensures a buffer for the 75% deployment requirement, and much less stressful deployments
Tests make use of test factories/utils class instead of creating their own data
- Test data includes scenarios with both invalid and valid inputs, e.g. different data types or values
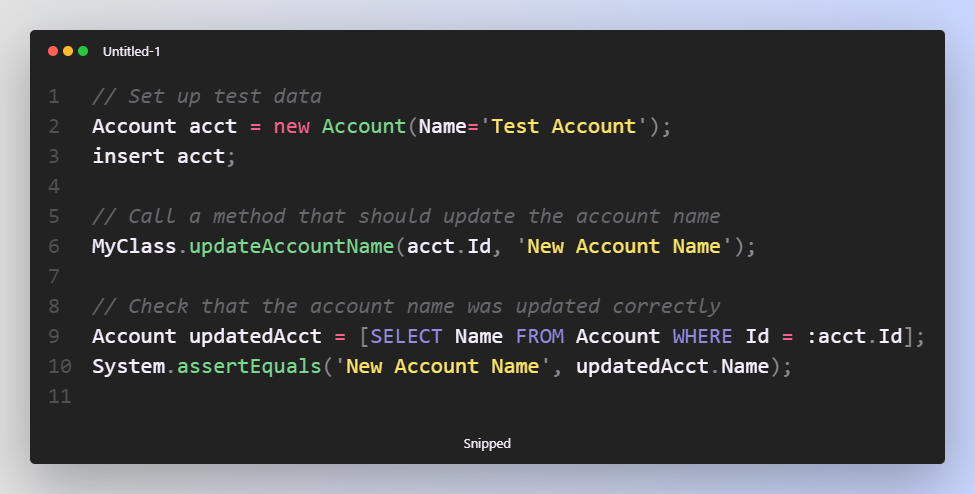
Tests include System.Assert to validate expected outcomes
- System.Assert: System.Assert is used to validate the expected outcome of a particular code block. It's important to include assertions in your test code to ensure that your code behaves as expected. Here's an example of how to use System.Assert in Apex:
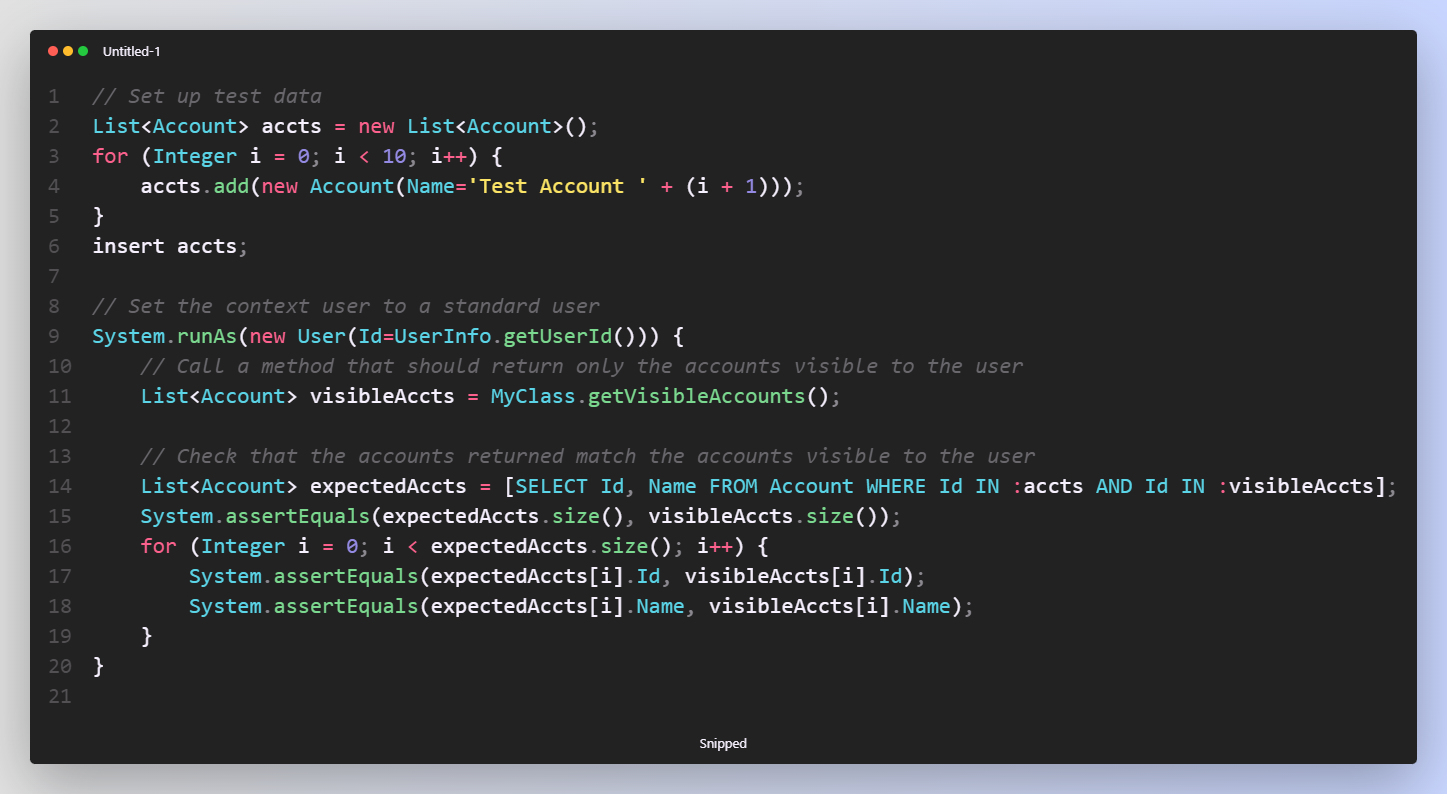
Tests use the runAs method to test in different user contexts and sharing
- runAs method:
The runAs method is used to test code in different user contexts and sharing settings. This is important because it allows you to test how your code behaves for different users and profiles. Here's an example of how to use the runAs method in Apex:
Tests do not use SeeAllData
- SeeAllData:
SeeAllData is a setting that determines whether test code can see all data in the organization, including production data. It's best practice to avoid using SeeAllData in your test code, because it can lead to unreliable tests and potential security issues. Here's an example of how to avoid using SeeAllData in Apex:
Tests check bulk scenarios
- Bulk scenarios:
When developing code, it's important to consider how it will behave when processing large volumes of data. It's a best practice to test your code using bulk scenarios to ensure it can handle large datasets. Here's an example of how to test bulk scenarios in Apex:

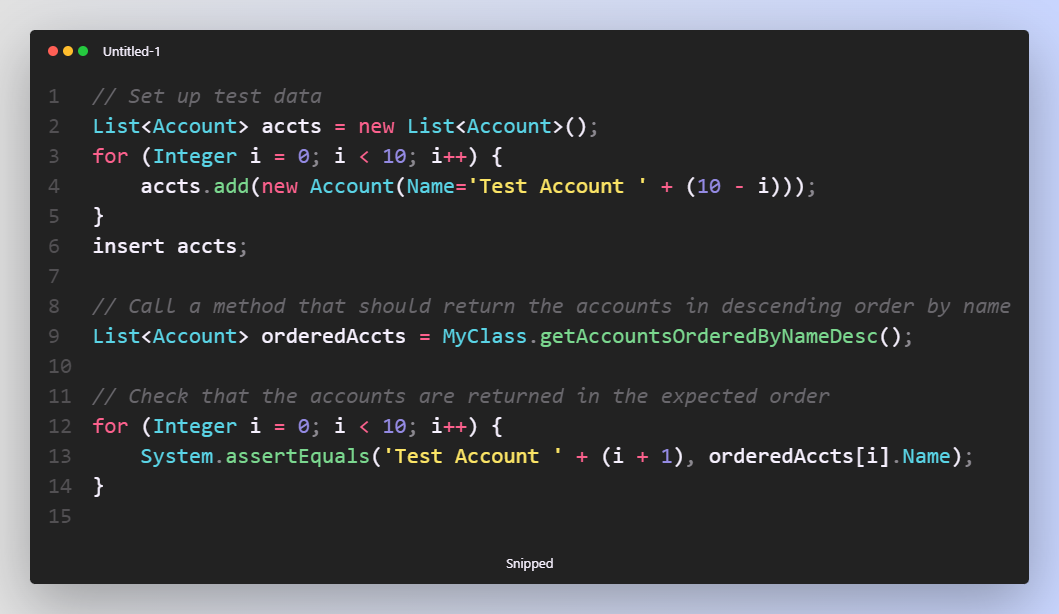
Tests use Order By to check the expected order
- Order By:
When retrieving data from the database, it's important to consider the order in which the data is returned. It's a best practice to test your code using Order By clauses to ensure the expected order is returned. Here's an example of how to use Order By in Apex:
Tests include comments (see comments section)
- Comments:
It's important to include comments in your test code to explain what the code is doing and why. This helps other developers understand the purpose of the test code and can be useful for troubleshooting. Here's an example of how to include comments in Apex:
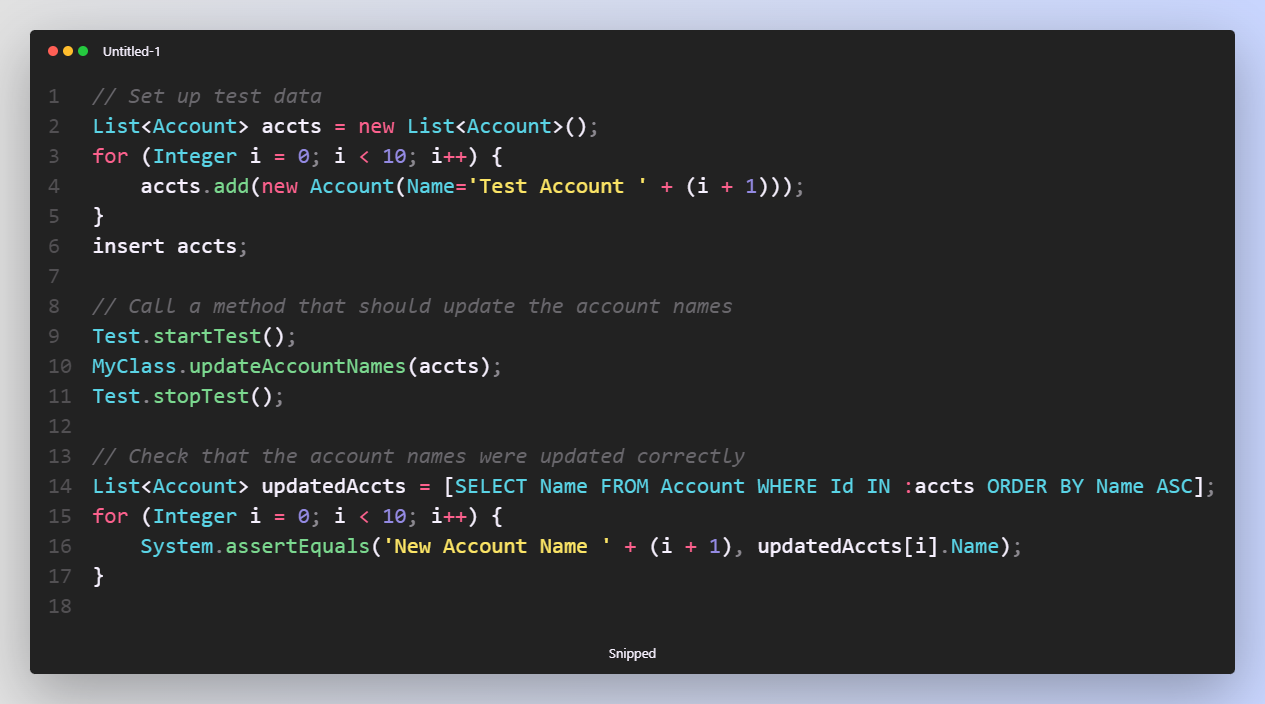
Tests use startTest() and stopTest()
- startTest() and stopTest():
The startTest() and stopTest() methods are used to mark the beginning and end of a block of code that should be timed separately from other code. This is useful when testing asynchronous code, or when testing code that includes multiple operations that may impact performance. Here's an example of how to use startTest() and stopTest() in Apex:
Tests enforce Sharing
- Enforcing Sharing:
Enforcing sharing means that your test code will respect the organization-wide sharing settings and other sharing rules defined in your Salesforce org. This is important to ensure that your code behaves correctly when deployed to a production environment. Here's an example of how to enforce sharing in Apex:
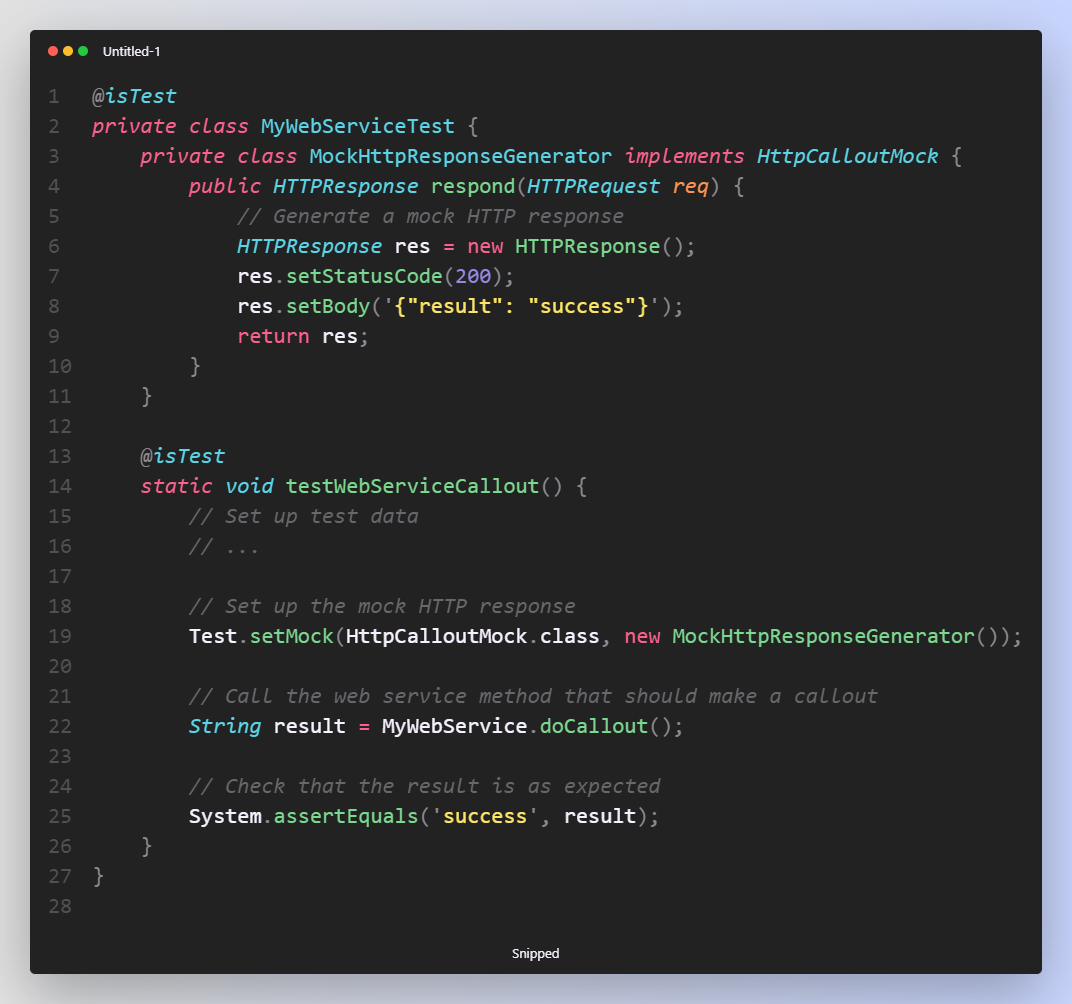
Tests leverage the mock testing framework to test web services
- Leveraging the mock testing framework:
The mock testing framework in Apex is a powerful tool for testing code that interacts with external systems, such as web services or email services. The framework allows you to simulate the behavior of the external system, so that you can test your code without actually sending requests to the external system.
Here's an example of how to use the mock testing framework in Apex to test a web service callout:
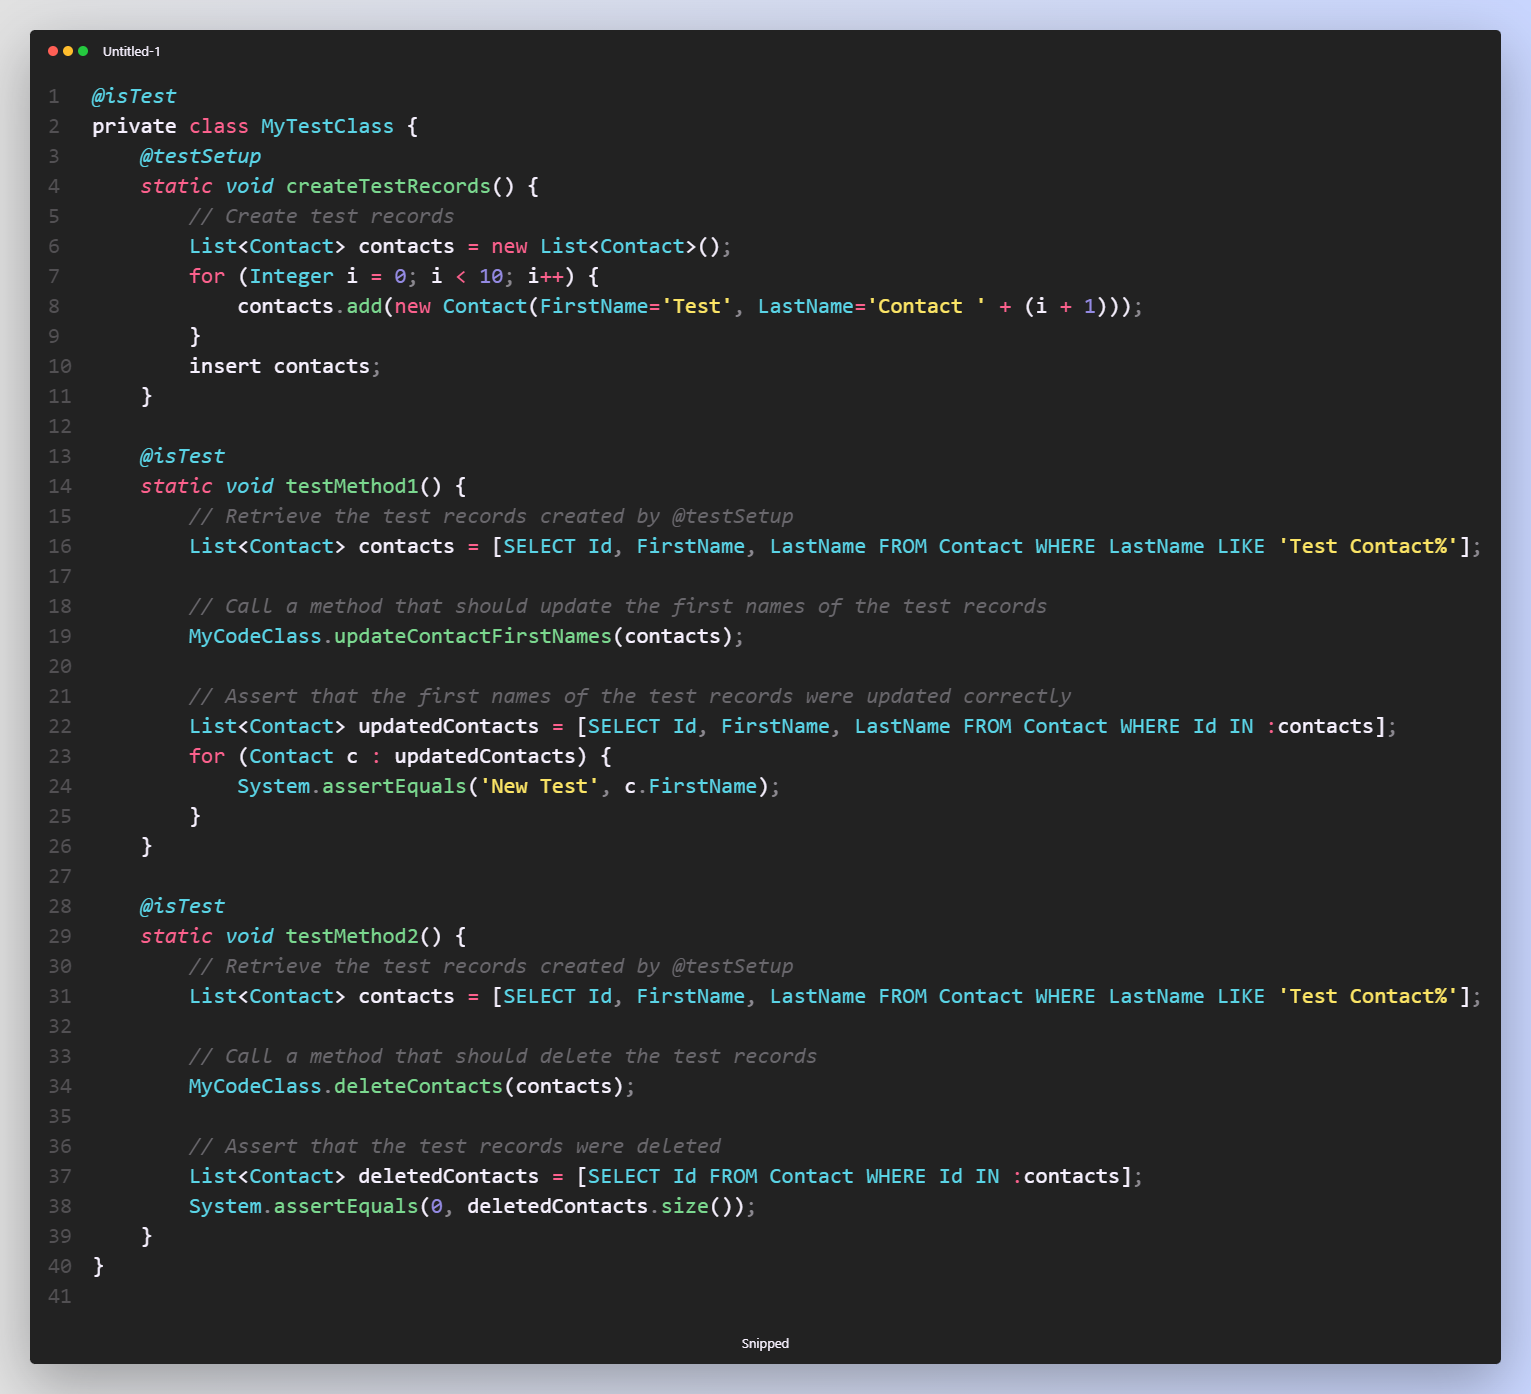
Tests leverage @testSetup annotation for creating data that can be reused in all test methods.
Avoid creating test data for each test method individually
Leveraging the @testSetup annotation:
The @testSetup annotation in Apex allows you to create test data that can be reused in all test methods in the same test class. This can be more efficient than creating test data for each test method individually, especially if the test data is complex or time-consuming to create. Here's an example of how to use the @testSetup annotation in Apex: